
CONCRETE TESTS

SLUMP TEST
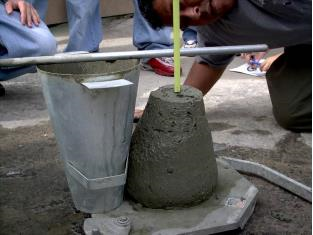
Concrete slump test is
to determine the workability or consistency of concrete mix. It is most simple
workability test for concrete, involves low cost and provides immediate
results.
Procedure:
• Take
a mould and clean the internal surface of the mould and apply oil
• Place
the mould on a smooth horizontal non-porous base plate
• Fill
the mould with the prepared concrete mix in 4 layers
• Tamp
each layer with 25 strokes of the rounded end of the tamping rod
• Remove
the excess concrete and level the surface with a trowel
• Clean
away the mortar or water leaked out between the mould and base plate
• Raise
the mould from the concrete immediately and slowly in vertical direction
• Measure
the slump as the difference between the height of the mould and that of height
point of the specimen being tested
v
Slump between 25mm – 50mm means that the
concrete mix has low workability
v
Slump between 50mm – 100mm indicates medium
workability
v
Slump
greater than 100mm indicates higher workability HOW TO
PREVENT LOW SLUMP:
ª Time
•
Eliminate every possible delay
•
Workable concrete must be established by trial ª Temperature
•
Cooling concrete materials such as aggregate and
water (ice, liquid nitrogen)
•
Slow rate of setting time by retarder or
supplementary cement material
ª Aggregate
• Sprinkled
to make aggregate wet and pre-saturate. So that they will not take water from
concrete after mixing or during pumping
• Highly
absorption poor aggregate preferably should not be used
CUBE TEST
Concrete cube test gives the compressive strength of concrete. It can be
defined as the characteristic strength of 150mm size concrete cube tested at 28
days. Compressive strength depends on many factors such as water cement ratio,
cement strength, quality of concrete material and quality control during
production, of concrete etc.
Procedure:
• First
take 150mm*150mm*150mm*150mm mould
• Then
pour concrete into the mould with three layers
• Each
layer shall be compacted with 35 blows

Figure7.6 – Cube crushing machine
using tamping rod. Diameter of tamping rod is 16mm.
It has 600mm length
• After
compacted top layer, surface is made in flush using trowel
• Cover
the mould with damp hessian cloth immediately
• Keep
it under 24 hours 22 ̊C - 32 ̊ C temperature
• Label
the cubes to identify
![]()
• After
24 hours, strip the mould and store the cubes in 24 ̊C -
30 C water for curing till taken out
just testing
• Cured
cubes are tested on a compression testing machine after 3, 7 or 28 days
Compressive strength of concrete = maximum compressive load
Cross sectional area of cube

|
Grade
of concrete |
Minimum compressive strength at 7
days N/mm2 |
Compressive strength at 28 days N/mm2 |
|
M15 |
10 |
15 |
|
M20 |
13.5 |
20 |
|
M25 |
17 |
25 |
|
M30 |
20 |
30 |
|
M35 |
23.5 |
35 |
|
M40 |
27 |
40 |
|
M45 |
30 |
45 |
Table
7.1 – Compressive strength for concrete grades
Causes for low compressive strength:
• Improper
concrete mix design
• Improper
concrete cube sample preparation
• Improper
curing condition
• Calculation
errors
• Errors
in crushing machine
REBOUND HAMMER TEST
Rebound hammer test
is done to determine the compressive strength of concrete. If cube test is fail
after 28 days, Engineer can instruct to do hammer test for the concrete
structure. In our site rebound hammer test was done for some pile caps. The rebound of an elastic
mass depends on the hardness of the surface against which its mass strikes.
When the plunger of the rebound hammer is pressed against the surface of the
concrete, the sprig controlled mass rebounds and the extent of such a rebound
depends upon the surface hardness of the concrete. The rebound value is red
from a graduated scale and the compressive strength can be read directly from
the graph provided on the body of
the
hammer.  Figure
7.10 – Rebound hammer test
Figure
7.10 – Rebound hammer test
Precautions for rebound hammer test:
• The
surface should be smooth, clean and dry.
• The
loose surface should be rubbed off with a grinding wheel before testing.
• The
point of impact should be at 20mm way from the edge or sharp discontinuity.
• The
test should not be conducted on the rough surface resulting from incomplete
compaction of concrete, loss of grout, spoiled or tooled surface.
|
Average rebound number |
Quality of concrete |
|
>40 |
Very good |
|
30-40 |
Good |
|
20-30 |
Fair |
|
<20 |
Poor or delaminated |


0 Comments